Ankle Microfracture – Patient Rehabilitation Guide
 Read What Mr Gordon’s Patients Are Saying
What Operation has been Performed?
A key hole operation using 2 small cuts has been performed (arthroscopy). This allows a small telescope and instruments to be placed inside the ankle. The damaged and loose articular cartilage (and bone) on the end of the bone has been removed. This leaves a defect with exposed bone. A cartilage stimulating procedure (microfracture) has been performed to encourage the body to cover the exposed bone with scar tissue. By penetrating the bone with a sharp instrument (a pick), cells arising from the bone marrow migrate over the defect and lay down scar tissue (not new cartilage), covering the exposed bone and so relieving pain. This has been performed arthroscopically (key hole) as a day case (no overnight stay). You will wake up with a rigid boot on.
Going Home After Surgery
Once you have eaten, passed water and are deemed safe on crutches by a physiotherapist or nurse, you may go home. This is normally after 2-4 hours after surgery. Someone will need to pick you up. For the first 2 weeks, no weight should be placed through the leg. You will need 2 crutches for this period.
Day of the Operation at Home
You may experience some discomfort and should take pain killers, such as Codeine with Diclofenac. These should be taken regularly (3-4 times/day) especially before physiotherapy or exercise sessions.
Leg Elevation and Boot Care
Elevate the ankle at the level of the chest, for 23 hours a day for 7 days (for pain relief, swelling and wound healing). Place 2 pillows under your mattress for elevation when sleeping. Keep the boot dry. You may use a ‘cast / bandage protector for bathing’, available on-line Eg. LimbO device.
Bandage and the Dressing – After 48 hours
After 48 hours, take your leg out of the boot, remove the white bandage (and gauze underneath) yourself.
2 dressings will remain underneath – leave these on. There may be some blood staining on the dressing, this is normal.
Place the leg back in the boot. Do not remove the boot until you have seen Mr Gordon at 2 weeks after the operation.
Rehabilitation Aims
The aim of rehabilitation is early joint motion, maintaining muscle strength and protection of the healing cartilage defect. There are different rehabilitation protocols in existence, as unfortunately, it is not known how best to rehabilitate from this type of surgery. Scientific studies are on-going. Mr Gordon uses the best available scientific evidence to formulate the right rehabilitation programme for you.
Accelerated Rehabilitation
Traditional rehabilitation regimes prevent full weight bearing for up to 8 weeks. The latest scientific evidence suggests this is not necessary.
After 2 weeks, the boot can be removed for Rehabilitation Exercises detailed below and physiotherapy, as often as you feel comfortable. Dedicated physiotherapy may commence 2 weeks after the operation.
Accelerated Rehabilitation Protocol
First 2 weeks (week 1-2):
Weight bearing status: Non weight bearing in boot with 2 crutches (no weight allowed through the leg)
After 2 weeks – for a total of 6 weeks (week 3-8):
Rigid walking boot can be removed for exercises
Weight bearing status: Full weight bearing as tolerated in rigid walking boot. Boot removed for sleep.
Range of Motion: Full range of motion of ankle
Activity: Light resistance on static bike (with boot on), start swimming (once wounds have been reviewed by Mr Gordon)
After 8 weeks:
Rigid walking boot removed and into a normal shoe
Weight bearing status: Full weight bearing in normal shoe
Activity: Machine weights, stiffer elastic band exercises, increasing resistance exercises
After 12 weeks:
Activity: Start treadmill jogging increasing to running (on even surfaces)
After 4 months:
Activity: Start sport specific training, increasing levels of activity depending on muscular strength and control.
High level athletes may return to full non-contact sport from now
After 6 months:
Activity: Start unrestricted (including contact) sports (high level athletes may return sooner), jumping and pivoting activities
1 year
It will take 1 year to fully assess the success of surgery
Driving
You need to be able to control the vehicle in an emergency. Can you stamp your foot down on the ground? For left sided surgery and no clutch is required, driving is probably safe after a few days post operatively. For right sided surgery, driving is safe at 8 weeks post operatively once the boot has been removed. You should check with your insurance company. If you are unsure, please ask Mr Gordon.
Returning to Work
Sedentary jobs: Return after 7 days
Standing/walking jobs: Return after 2 weeks
Manual/labouring jobs: Return after 8-12 weeks
Out Patient Visits to see Mr Gordon
2 weeks – to assess wound healing
6 weeks – to assess pain, swelling, muscle bulk and range of motion
12 weeks – to assess pain, swelling, muscle bulk and range of motion and to advise on increasing activity level
4-6 months – to assess recreational/sporting goals and targets
9 months –to assess recreational/sporting goals and targets
1 year – final review depending on progress
Rehabilitation Exercises – to be done every 2 hours

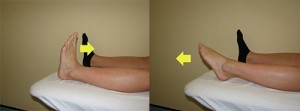
1. Active Ankle Dorsiflexion (foot up) and Plantarflexion (foot down)
Move foot up and down (1 repetition)
Repeat 20 times over 60 seconds

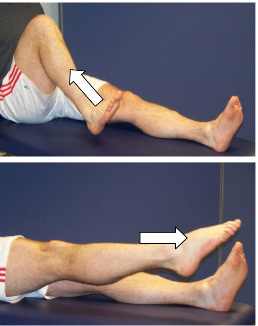
2. Triple Flexion/Extension (hip, knee, ankle)
Bring knee toward chest bringing foot and ankle up
Straighten leg, pointing toes
Repeat 30 times
References
1.van Eekeren IC, Reilingh ML, van Dijk CN Rehabilitation and return-to-sports activity after debridement and bone marrow stimulation of osteochondral talar defects. Sports Med 2012;42:857-70
2.Hannon CP, Murawski CD, Fansa AM, Smyth NA, Do H, Kennedy JG Microfracture for osteochondral lesions of the talus: a systematic review of reporting of outcome data. Am J Sports Med 2013;41:689-95.
3.Lee DH, Lee KB, Jung ST, Seon JK, Kim MS, Sung IH Comparison of early versus delayed weightbearing outcomes after microfracture for small to midsized osteochondral lesions of the talus. Am J Sports Med 2012;40:2023-8.
 Call for an Appointment


